I did a restore/recover from my original RAC to another RAC in another server. When i created the ASM diskgroups, I change one of their original names, exactly +FRAN_DATA for +DATA.
The restore/recover was ok but when i tried to open database with "resetlogs" option i got ORA-00392 and ORA-00312.
The solution is easy, you should clear the busy onlinelog and later change one by one all the redologs name until you can open database with resetlogs option. Something ike this:
SQL> alter database open resetlogs;
alter database open resetlogs
*
ERROR en lÃnea 1:
ORA-00392: el log 27 del thread 2 se está limpiando, operación no permitida
ORA-00312: log online 27 thread 2: '+DATA/fran/onlinelog/group_27'
SQL> alter database clear logfile group 27;
Base de datos modificada.
SQL> alter database open resetlogs;
alter database open resetlogs
*
ERROR en lÃnea 1:
ORA-00349: fallo al obtener el tamaño del bloque para
'+FRAN_DATA/fran/onlinelog/group_20'
ORA-15001: diskgroup "FRAN_DATA" does not exist or is not mounted
ORA-15001: diskgroup "FRAN_DATA" does not exist or is not mounted
SQL> alter database rename file '+FRAN_DATA/fran/onlinelog/group_20' to '+DATA/fran/onlinelog/group_20';
Base de datos modificada.
SQL> alter database open resetlogs;
alter database open resetlogs
*
ERROR en lÃnea 1:
ORA-00349: fallo al obtener el tamaño del bloque para
'+FRAN_DATA/fran/onlinelog/group_21'
ORA-15001: diskgroup "FRAN_DATA" does not exist or is not mounted
ORA-15001: diskgroup "FRAN_DATA" does not exist or is not mounted
SQL> alter database rename file '+FRAN_DATA/fran/onlinelog/group_21' to '+DATA/fran/onlinelog/group_21';
Base de datos modificada.
SQL> alter database open resetlogs
2 ;
alter database open resetlogs
*
ERROR en lÃnea 1:
ORA-00349: fallo al obtener el tamaño del bloque para
'+FRAN_DATA/fran/onlinelog/group_22'
ORA-15001: diskgroup "FRAN_DATA" does not exist or is not mounted
ORA-15001: diskgroup "FRAN_DATA" does not exist or is not mounted
SQL> alter database rename file '+FRAN_DATA/fran/onlinelog/group_22' to '+DATA/fran/onlinelog/group_22';
Base de datos modificada.
SQL> alter database open resetlogs;
alter database open resetlogs
*
ERROR en lÃnea 1:
ORA-00349: fallo al obtener el tamaño del bloque para
'+FRAN_DATA/fran/onlinelog/group_23'
ORA-15001: diskgroup "FRAN_DATA" does not exist or is not mounted
ORA-15001: diskgroup "FRAN_DATA" does not exist or is not mounted
SQL> alter database rename file '+FRAN_DATA/fran/onlinelog/group_23' to '+DATA/fran/onlinelog/group_23';
Base de datos modificada.
SQL> alter database rename file '+FRAN_DATA/fran/onlinelog/group_24' to '+DATA/fran/onlinelog/group_24';
Base de datos modificada.
SQL> alter database open resetlogs;
alter database open resetlogs
*
ERROR en lÃnea 1:
ORA-00349: fallo al obtener el tamaño del bloque para
'+FRAN_DATA/fran/onlinelog/group_25'
ORA-15001: diskgroup "FRAN_DATA" does not exist or is not mounted
ORA-15001: diskgroup "FRAN_DATA" does not exist or is not mounted
SQL> alter database rename file '+FRAN_DATA/fran/onlinelog/group_25' to '+DATA/fran/onlinelog/group_25';
Base de datos modificada.
SQL> alter database rename file '+FRAN_DATA/fran/onlinelog/group_26' to '+DATA/fran/onlinelog/group_26';
Base de datos modificada.
SQL> alter database open resetlogs;
Base de datos modificada.
:)
martes, 9 de julio de 2013

viernes, 21 de junio de 2013
Remove RAC (11.2.0.3) + ASM under RHEL 5
In that example, i am working with RAC (2 nodes, Oracle database 11.2.0.3) + ASM under RHEL 5.3
1) Search in /etc/oratab the instances (in all nodes):

2) Start DBCA, select Oracle Real Application Clusters Database, select Delete a database, and select the database that you want to delete. Repeat this step to delete all databases.
3) Run asmca to drop diskgroups

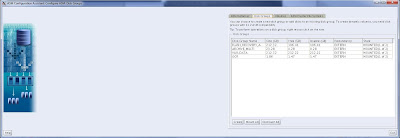
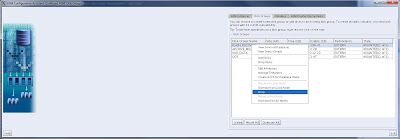
Select the diskgroup, and right click on it, later “drop”
Accept:
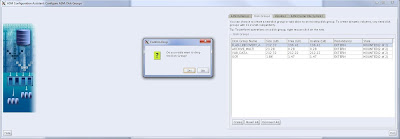
*do the same with all diskgroups.
======================================================================
======================================================================
1) Search in /etc/oratab the instances (in all nodes):

3) Run asmca to drop diskgroups

Select the diskgroup, and right click on it, later “drop”

Accept:

*do the same with all diskgroups.
======================================================================
PROBLEMS DROPPING ASM DISKS
======================================================================
Depends the configuration of the asm disks, probably you can't drop all disks. :
OPTION 1:
OPTION 1:
You have to create a pfile from spfile and startup with pfile:

Connect as “sys / as sysasm” and create pfile from current spfile (do it in both nodes):

Shutdown database and restart with the pfile created, and try to drop the diskgroup again:
OPTION 2:
SQL> alter diskgroup XXX force dismount;
*in all nodes except in one, where you are going to run "drop diskgroup" have to be mounted.
SQL> drop diskgroup XXX force including contents;
OPTION 3:
*only if It is a OCFS diskgroup
In asmca window, go to “ASM Cluster File Systems” and remember the path of “Active Mount Point”


Only in one node the diskgroup must be “mounted” (where you execute “drop diskgroup"), in the others should be “dismounted”:
In node 1:

In node 2:
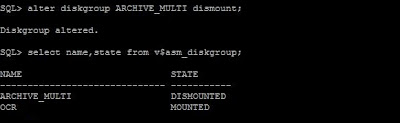


**to remove ASM entry for OCR you should stop asm and remove it:
$srvctl remove asm
4) Go to /etc/init.d and run “oracleasm listdisks” to list all your asm disks and later use “oracleasm deletedisk XXX” on all.

5) deconfigure asm configuration, starting with listener and clusterware resources as “ORACLE” user:

6) To uninstall grid infrastructure, run "deinstall" in all nodes (it is under your GRID_HOME), you can do it in parallel:

*In all questions, you have to answer with default option or yes. Almost at the end, you also have to execute some scripts with root user to continue.
7) To uninstall oracle database infrastructure, run "deinstall" in all nodes (it’s under your ORACLE_HOME), you can do it in parallel:


OPTION 2:
SQL> alter diskgroup XXX force dismount;
*in all nodes except in one, where you are going to run "drop diskgroup" have to be mounted.
SQL> drop diskgroup XXX force including contents;
OPTION 3:
*only if It is a OCFS diskgroup
In asmca window, go to “ASM Cluster File Systems” and remember the path of “Active Mount Point”


In node 1:


If you have OCR disks (VOTING DISKS) in ASM, you must drop it like follow as “ROOT”:


**to remove ASM entry for OCR you should stop asm and remove it:
$srvctl remove asm
4) Go to /etc/init.d and run “oracleasm listdisks” to list all your asm disks and later use “oracleasm deletedisk XXX” on all.

5) deconfigure asm configuration, starting with listener and clusterware resources as “ORACLE” user:


*In all questions, you have to answer with default option or yes. Almost at the end, you also have to execute some scripts with root user to continue.
7) To uninstall oracle database infrastructure, run "deinstall" in all nodes (it’s under your ORACLE_HOME), you can do it in parallel:

miércoles, 29 de mayo de 2013
Differences between PSU , CPU and SPU and how to install
======================================================================
Critical Patch Update (CPU) --> Release of security fixes each quarter instead the cumulative database security patch for the quarter.
Patch Set Updates (PSU) --> Cumulative patches that include both the security fixes and priority fixes. They are "version upgrades" modifying the las number of version (11.2.0.1.1, 11.2.0.1.2,...).
Security Patch Update (SPU) --> It is the new terminology of CPU (From October 2012) . SPU's can't be applied if any PSU's have been applied, unless your database is upgraded with a new base version.
======================================================================
======================================================================
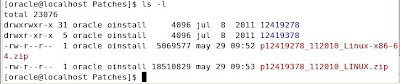
In that example we are going to install Patch 12419278 (CPU) and Patch 12419378 (PSU), Updates released on July 19, 2011. To download them we have to go to MOS (My Oracle Support) and "search" them, select your OS version (In that case, Linux x86) and download.
1) Unzip both Patches
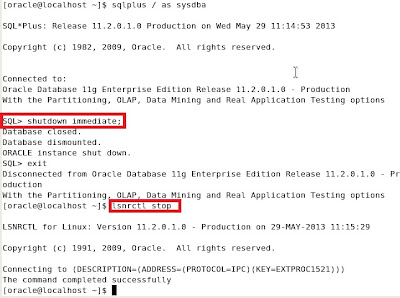
5) Be sure that executables "make", "ar", "ld" and "nm" are under $PATH. Usually this executables are under "/usr/ccs/bin". If you haven't it just run "export PATH=$PATH:/usr/ccs/bin
6) Go to the unziped Path directory and execute Opath utility:

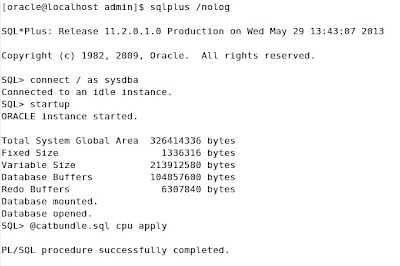
8) The last step is check for any error at .log generated by catbundle script. At the end of the script it says where to find that log, It should be at $ORACLE_HOME/cfgtoollogs/catbundle. If exists any error, you should read "section 4: known issues" from README document to resolve it.
1) Like we just do the pre-install steps, we can run directly the command to execute the PSU. If you didn't install CPU you have to do it from the beggining, execute steps 1,2,3,4,5 from "How To Install CPU"
*Execute the next command to verify that you haven't any conflicting patch installed:

After verify it, apply the PSU, go to the unzipped directory and execute "$ORACLE_HOME/Opatch/opatch apply"

2) Continue with step 7 and 8 of "How To Istalling CPU"
WHAT'S THE MEANING OF ...
======================================================================Critical Patch Update (CPU) --> Release of security fixes each quarter instead the cumulative database security patch for the quarter.
Patch Set Updates (PSU) --> Cumulative patches that include both the security fixes and priority fixes. They are "version upgrades" modifying the las number of version (11.2.0.1.1, 11.2.0.1.2,...).
Security Patch Update (SPU) --> It is the new terminology of CPU (From October 2012) . SPU's can't be applied if any PSU's have been applied, unless your database is upgraded with a new base version.
======================================================================
How To Install CPU?
======================================================================
In that example we are going to install Patch 12419278 (CPU) and Patch 12419378 (PSU), Updates released on July 19, 2011. To download them we have to go to MOS (My Oracle Support) and "search" them, select your OS version (In that case, Linux x86) and download.
1) Unzip both Patches

2) We are goint to Install first CPU (12419278), so first for all open a document called "README.html", it will open a browser with the information, bugs fixed, known issues,steps to install it, ... for this CPU. I recommend read it before do something.
3) Check Opatch version, it would be recommend the latest, or at least 11.2 to continue. You can download the last version at Last Version Opatch.
*For install the last version you have to download the last version --> copy or move the contents of your old $ORACLE_HOME/Opatch directory to another directory --> delete the contents of $ORACLE_HOME/Opatch (don't delete the directory) --> unzip last version Opatch into $ORACLE_HOME/Opatch
- To check Opatch version, Open a termianl go to $ORACLE_HOME/Opatch and execute "opatch lsinventory"

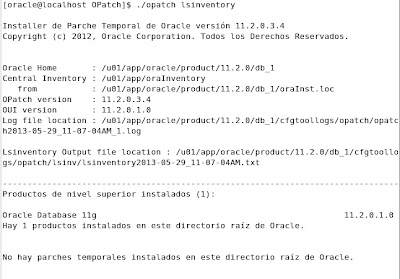
4) Shutdown all instances and listeners associated with Oracle_home that we are updating.
*For install the last version you have to download the last version --> copy or move the contents of your old $ORACLE_HOME/Opatch directory to another directory --> delete the contents of $ORACLE_HOME/Opatch (don't delete the directory) --> unzip last version Opatch into $ORACLE_HOME/Opatch
- To check Opatch version, Open a termianl go to $ORACLE_HOME/Opatch and execute "opatch lsinventory"


4) Shutdown all instances and listeners associated with Oracle_home that we are updating.

5) Be sure that executables "make", "ar", "ld" and "nm" are under $PATH. Usually this executables are under "/usr/ccs/bin". If you haven't it just run "export PATH=$PATH:/usr/ccs/bin
6) Go to the unziped Path directory and execute Opath utility:

7) When finish, open a terminal and connect to sqlplus as sysdba to startup database and execute catbundle.sql script:

======================================================================
How To Install PSU?
======================================================================1) Like we just do the pre-install steps, we can run directly the command to execute the PSU. If you didn't install CPU you have to do it from the beggining, execute steps 1,2,3,4,5 from "How To Install CPU"
*Execute the next command to verify that you haven't any conflicting patch installed:


2) Continue with step 7 and 8 of "How To Istalling CPU"
martes, 30 de abril de 2013
Install ASM on existing Oracle database 11gR2
======================================================================
DOWNLOADS
======================================================================
- ASMLIB (Step 4- Prerequisites)
- Grid --> Grid_download
======================================================================
PRE-REQUISITES
======================================================================
1) To see our partitions we have to open a terminal, connect as root user and write "cat /proc/partitions"

I have 3 partitions, two of 2Gb and one of 3Gb called hdb,hdc and hdd (hda is the primary master, don't do anything!!)

2) To configure the partitions, we have to use fdisk utility. Like partitions are under /dev/sdX, we have to run fdisk /dev/sdX, one time for each partition. In that step, we will write "n","p" "1" (number 1) and "w" (in that order):


3) If we list partitions again we will show the result:

4) We have to download ASM libraries and drivers. The easy way is using yum utility. Open a terminal with root user and execute:

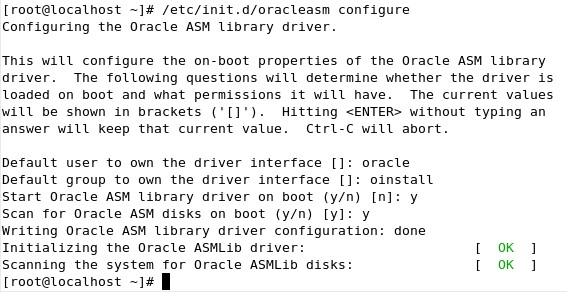
5) Now we have to configure the kernel module for ASM executing "/etc/init.d/oracleasm configure" with root. The answers this time will be "oracle", "oinstall", "y" and "y"
6) Create disks for ASM
/etc/init.d/oracleasm createdisk ASM1 /dev/sdb1
/etc/init.d/oracleasm createdisk ASM2 /dev/sdc1
/etc/init.d/oracleasm createdisk ASM3 /dev/sdd1

7) run scandisk and listdisk to be sure that we have all asmdisk available.
/etc/init.d/oracleasm scandisks
/etc/init.d/oracleasm listdisks
/etc/init.d/oracleasm listdisks

======================================================================
INSTALLATION
======================================================================
1) with user oracle, "Unzip" grid software:

2) execute /grid/runInstaller (grid directory is created when we unzipped grid software) to start grid configuration window

3) choose the second option and "Next"

4) choose your language and "Next"

5) In that window we only select 2 asmdisk for DATA (the other will be for Flash_recovery_area, we will do it later), it's important choose Extern Redundancy
(you can select the path of your DISKs in "Change discovery path", by default "/dev/oracleasm/disks"):

6) Time to choose our passwords, different password for accounts or the same password for all the accounts, like you want

7) Select all groups as dba and "Next" (will appear a warning, but ignore it)


8) Select the path where grid will be installed

9) In that step, the installation check that all will be ok, if not you have to check the description of the error and solve it, when all will be ok, "next"

10) Verify the information showed and "Finish"

11) wait untill installation finish

12) Almost at the end of the installation will appear a new window, we must run root.sh with root user, when finish click on accept, and the installation will continue.

Set /usr/local/bin like teh full pathname of the local bin directory.

*like we had installed an oracle database before, you must overwrite dbhome, oraenv and coraenv
13) when the installation finish, close the window.

14) We have already installed grid infraestructure, now we are going to add FLASH_RECOVERY_AREA to the other free asmdisk (step 5). We need to run asmca, to do it we must set the correct ORACLE_HOME and ORACLE_SID. In this case ORACLE_SID will be +ASM and ORACLE_HOME is the grid path. To go to the easy way, open a terminal and write "oraenv", you will be question for the new ORACLE_SID, write "+ASM" and the ORACLE_HOME automatically change too:

15) A new window appears, choose create:

16) Now choose the name, select "extern" and select the disk. "Next"

17) We have now both asmdisks:

Suscribirse a:
Entradas (Atom)