martes, 30 de abril de 2013

Install ASM on existing Oracle database 11gR2


======================================================================
DOWNLOADS


======================================================================
- ASMLIB (Step 4- Prerequisites)
- Grid --> Grid_download

======================================================================
PRE-REQUISITES

======================================================================

1) To see our partitions we have to open a terminal, connect as root user and write "cat /proc/partitions"


I have 3 partitions, two of 2Gb and one of 3Gb called hdb,hdc and hdd (hda is the primary master, don't do anything!!)


2) To configure the partitions, we have to use fdisk utility. Like partitions are under /dev/sdX, we have to run fdisk /dev/sdX, one time for each partition. In that step, we will write "n","p" "1" (number 1) and "w" (in that order):


3) If we list partitions again we will show the result:


4) We have to download ASM libraries and drivers. The easy way is using yum utility. Open a terminal with root user and execute:


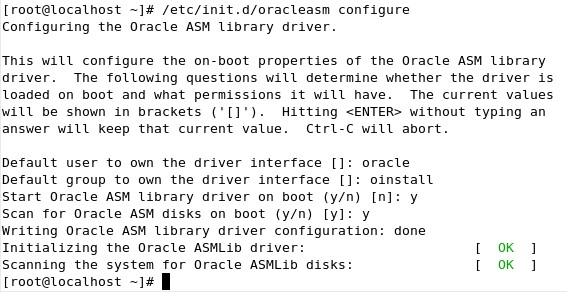
5) Now we have to configure the kernel module  for ASM executing "/etc/init.d/oracleasm configure" with root. The answers this time will be "oracle", "oinstall", "y" and  "y"


6) Create disks for ASM
/etc/init.d/oracleasm createdisk ASM1 /dev/sdb1
/etc/init.d/oracleasm createdisk ASM2 /dev/sdc1
/etc/init.d/oracleasm createdisk ASM3 /dev/sdd1


7) run scandisk and listdisk to be sure that we have all asmdisk available.
/etc/init.d/oracleasm scandisks 
/etc/init.d/oracleasm listdisks 


======================================================================
INSTALLATION

======================================================================

1) with user oracle, "Unzip" grid software:


2) execute /grid/runInstaller (grid directory is created when we unzipped grid software) to start grid configuration window


3) choose the second option and "Next"


4) choose your language and "Next"


5) In that window we only select 2 asmdisk for DATA (the other will be for Flash_recovery_area, we will do it later), it's important choose Extern Redundancy
(you can select the path of your DISKs in "Change discovery path", by default "/dev/oracleasm/disks"):


6) Time to choose our passwords, different password for accounts or the same password for all the accounts, like you want


7) Select all groups as dba and "Next" (will appear a warning, but ignore it)


8) Select the path where grid will be installed


9) In that step, the installation check that all will be ok, if not you have to check the description of the error and solve it, when all will be ok, "next"


10) Verify the information showed and "Finish"


11) wait untill installation finish


12) Almost at the end of the installation will appear a new window, we must run root.sh with root user, when finish click on accept, and the installation will continue.


Set /usr/local/bin like teh full pathname of the local bin directory.


*like we had installed an oracle database before, you must overwrite dbhome, oraenv and coraenv


13) when the installation finish, close the window.


14) We have already installed grid infraestructure, now we are going to add FLASH_RECOVERY_AREA to the other free asmdisk (step 5). We need to run asmca, to do it we must set the correct ORACLE_HOME and ORACLE_SID. In this case ORACLE_SID will be +ASM and ORACLE_HOME is the grid path. To go to the easy way, open a terminal and write "oraenv", you will be question for the new ORACLE_SID, write "+ASM" and the ORACLE_HOME automatically change too:


15) A new window appears, choose create:


16) Now choose the name, select "extern" and select the disk. "Next"


17) We have now both asmdisks:


lunes, 29 de abril de 2013

How to install CentOS 5


We are going to install CentOS 5 for intall in the future Oracle database 11gR2. For this purpose, follow this steps:

======================================================================
INSTALLATION

======================================================================

1) Press enter to install Centos 5 in graphical mode :


                                2) choose skip


                                3)Next


                                                                4)Select your language and click next:


                                                                5)Select your Keyboard language and next:


                                                                     6) Select “delete all Linux partitions and créate standard design”, next


                                                                     7) In network, by default you have eth0, it is ok, so go to “next”


                                                                     8) Select your correct clock and next


                                                                     9) Set the password for root user:


                                                                     10) Next, you can configure later


                                                                     11) Next


                                                                    12) The installation starts:


                                                                                                    13) When the installation had finished, click on reboot (without the disk):


======================================================================
CONFIGURATION

======================================================================

When your server has been rebooted, it’s time to configure:

      1) Next


                                                                                                                      2)    Disable and Next


                                                                                                      3)      Disable and next


                                                                                                      4)      Select the correct data and next


                                                                                                      5)      Still we don’t need any user, we will create later (in the installation of Oracle database), click on next


                                                                                                      6)      Next


                                                                                                      7)      Finish (reboot again)


                                                                                                                8) And we have CentOS installed:


miércoles, 24 de abril de 2013

Install Oracle 11gR2 on RHEL 5 (step by step)

To install RHEL 5 you can follow one of my guide (It's about CentOS but are the same steps) --> my guide.


*****************************************************************************************************************
SOFTWARE

*****************************************************************************************************************


First of all, you have to download the software of Oracle database 11gR2 (the newest version is 11.2.0.3 but i will install 11.2.0.1 to upgrade it in the future in that blog, you can download and install any version following this guide):
To download database 11gR2 software:  http://www.oracle.com/technetwork/database/enterprise-edition/downloads/index.html


*****************************************************************************************************************
PRE-CONFIGURATION


*****************************************************************************************************************


1) With user Oracle, Unzip files:


[oracle@localhost ~]unzip linux.x64_11gR2_database_1of2.zip
[oracle@localhost ~]unzip linux.x64_11gR2_database_2of2.zip


2) add at the end of /etc/hosts the next:

<IP-address>   <full_machine_name>   <machine_name>
*by default if you are using your own PC add --> 127.0.0.1   localhost.localdomain   localhost


3) To download all rpm's necessary , we can do it automatically with this easy way:

With user root go to /etc/yum.repos.d/ and execute wget http://public-yum.oracle.com/public-yum-el5.repo


and execute"yum install oracle-validated -y" or "yum install oracle-rdbms-server-11gR2-preinstall" to install all rpm's required automatically:


*if you have another Oracle Linux version go to http://public-yum.oracle.com and follow the steps.


To install rpm's manually or update:

[root@localhost ~]yum -y install gcc
[root@localhost ~]yum -y install gcc-c++
[root@localhost ~]yum -y install compat-libstdc++-33
[root@localhost ~]yum -y install libstdc++-devel
[root@localhost ~]yum -y install elfutils-libelf-devel
[root@localhost ~]yum -y install glibc-devel
[root@localhost ~]yum -y install libaio-devel
[root@localhost ~]yum -y install sysstat
[root@localhost ~]yum -y install perl-URI
[root@localhost ~]yum -y install net-snmp
[root@localhost ~]yum -y install sendmail-cf
[root@localhost ~]yum -y install httpd
[root@localhost ~]yum -y install mod_ssl
[root@localhost ~]yum -y install php
[root@localhost ~]yum -y install php-gd
[root@localhost ~]yum -y install php-mbstring
[root@localhost ~]yum -y install php-ldap
[root@localhost ~]yum -y install bitstream-vera-fonts
[root@localhost ~]yum -y install librsvg2
[root@localhost ~]yum -y install xorg-x11-xinit
[root@localhost ~]yum -y install fonts-*


4) continue with root user, go to /etc/sysctl.conf and add or replace (with "vi" or another editor) the follow kernel parameters (this values are recommended by Oracle):

fs.suid_dumpable = 1
fs.aio-max-nr = 1048576
fs.file-max = 6815744
kernel.shmall = 2097152
kernel.shmmax = 536870912
kernel.shmmni = 4096
kernel.sem = 250 32000 100 128
net.ipv4.ip_local_port_range = 9000 65500
net.core.rmem_default=4194304
net.core.rmem_max=4194304
net.core.wmem_default=262144
net.core.wmem_max=1048586


after that, execute /sbin/sysctl -p to update the new values:


5) Now go to /etc/security/limits.conf and add this lines at the end (root user):

oracle  soft    nproc   2047
oracle  hard    nproc   16384
oracle  soft    nofile  4096
oracle  hard    nofile  65536


6) Add new groups and users (still with root user):

[root@localhost ~]/usr/sbin/groupadd dba
[root@localhost ~]/usr/sbin/groupadd oinstall
[root@localhost ~]/usr/sbin/useradd -g oinstall -G dba oracle
[root@localhost ~]passwd oracle

*when you run "passwd oracle" you have to write your password (remember it!!)

7) Create ORACLE_HOME with root user


8) Connect as oracle user and modify .bash_profile as follow:


*****************************************************************************************************************
INSTALLATION

*****************************************************************************************************************


1) When you unzip the database software, automatically was created a folder called "database", now we have to run ./runInstaller from this folder (with oracle user, close root user and login as oracle user)


2) After execute ./runInstaller, a quick test of three basic points will be fired and must be "correct" to continue:


3) In the first window just un-select "I wish to receive security updates via My Oracle Support" and click on "Next" (will appear a new windows that say we haven't add a mail, just click on continue)


4) Create and configure database and Next

5)Desktop class and Next

6) You can change the global database name, my database will be called Fran, and you can choose the password you want, a warning will be appear if you choose a password that violates Oracle recommendations (but just a warning, you can skip if you want).


7) After another requeriment test (all should be correct, if not you have to solve the reported errors and "check again" until all will be correct)

8) In the last windos, will be shown our configuration, click "Finish"

9) The installation of the software starts:

10) Almost at the end of the installation will appear the window of "Database Configuration Assistant". (which creates the database and instance)


11) when the installation finish, will appear a new window. You can now unlock users and write Its passwords, also  I recommend save Oracle Enterprise Link. click on 'Next'

12) In the new window ask us to execute a script called root.sh (it is allocated in $ORACLE_HOME). Open a termianl and run it with root user:

Open a new terminal and connect as root user, then execute both scripts.

*when question us for the full pathname of the local bin directory, just click on "Enter", don't write anything:
13) when finish you can close the terminal. Accept that window and close the installation window. We have now Oracle database installed.
By default, a log with the information about the installation are been saved into /u01/app/oraInventory/logs/installActions<date_of_installation>.log


Thanks for choose this guide, hope it helps someone someday :)